Creating a Porcelain Environment

Working with porcelain in the studio presents a handful of challenges — especially if you work with other clays as well in the same small space, like I do! I have to thoroughly clean my wheel and workspace when moving from my red stoneware to pure, pristine porcelain. In fact, some would say trying to work with both a red stoneware and porcelain in the same space is ridiculous because of the likelihood of contaminating the porcelain.

But I accidentally found a GREAT solution while at Lowe’s looking for a wooden board to lay across my table that I could use only when working with porcelain. I found this instead:

Using a kitchen counter segment from Lowe's
Using a kitchen counter segment from Lowe’s

And it works amazingly well! It’s a laminated kitchen counter segment, and it fits perfectly on top of my 6′ folding table that I use as a workspace. When I am ready to go back to red stoneware, I will box up all these porcelain tools and store the counter against the wall. I have duplicate tools for red stoneware, so there is no cross-contamination. I love discovering simple solutions!

Red Clay Dipped in Porcelain Slip

Armadillo Cinco Rojo, dipped in Laguna Frost Porcelain; here ready to fire. I love working with Cinco Rojo–it is friendly and easy, and is a beautiful color while in the making stages. I am anxious to see how it turns out after the firing! I am also learning to work with porcelain, and am curious to see how my experiment of combining the two turns out.

The porcelain slip used here has been collected from my throwing water and then blended with a hand mixer. I dipped the pieces into the slip, and wiped off the bottoms. Into the kiln they go, fired to cone 06 for bisque.

slipcoveredbowl

porcelainslipmug

John Britt’s New Glaze Book

I just ordered John Britt’s new glaze book for Cone 4-7, The Complete Guide to Mid-Range GlazesJohn has an extensive YouTube channel of great videos for the self-taught, or really for anyone. I have learned a lot from him over the last couple of years. You can order a signed copy from his website (free shipping!) www.JohnBrittPottery.com.

One reason I love John’s videos is that he usually ends them with some saying like, “Now go make 25 of those and I’ll see you in the morning.” Because he knows that effortlessness requires lots and lots of effort! I am excited to get the book and learn more about glaze-making.JohnBritts book

Samantha Henneke’s Glazes are Divine!

Just look at them!

Beautiful expression!
Samantha Henneke,  Bulldog Pottery, Seagrove, NC


I wrote previously about Harold Speed’s ideas about hidden rhythms and emotional significance in our creative expressions. Samantha and her husband, Bruce Gholson, work collaboratively concocting these dreamy glazes, and I think their work is a fine example of Speed’s ideas.

Speed believed that the appeal of a work depended upon the artist’s ability to capture truth and naturalness in their work. I believe this is so because universal themes and truths draw us in every art form, whether they are present in literature or the visual arts.

Samantha Henneke
Samantha Henneke, Bulldog Pottery, Seagrove, NC

With exquisite forms and amazing glazes, Samantha Henneke’s work is certainly arresting (Speed’s term) and appealing. Really, I am a bit awestruck by her colors and layering. Samantha gives equal credit to Bruce for their work in creating amazing glazes. She says their entire studio is a collaboration. WOW, amazing creativity, and a love story as well! You rock, Samantha and Bruce! You can read their Blog and see more of their work. Be sure to check out Samantha’s amazing photos of insects.

Samantha.Henneke.Yellowvase
Samantha Henneke, Bulldog Pottery, Seagrove, NC
bruce.gholson.jug
Bruce Gholson, Bulldog Pottery, Seagrove, NC

Reclaiming Clay to Use Again

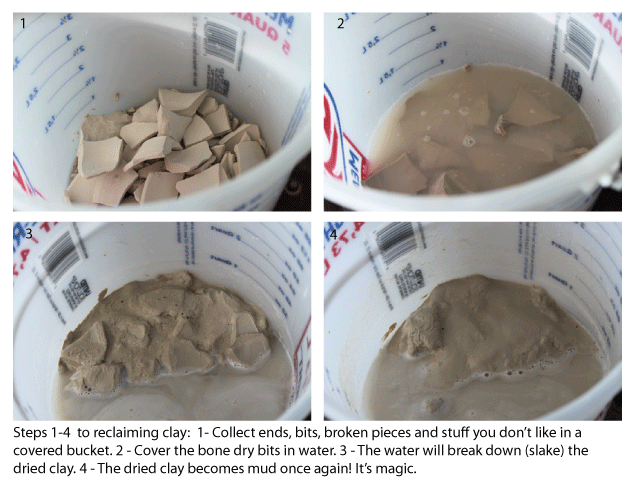
Though clay is a very inexpensive material compared to many other art supplies, it can still add up as a material cost. The good news is that the clay bits, leftovers and other odds and ends that you don’t use can be completely recycled very easily in just a few steps with some basic tools. The first panel below shows the Steps 1-4.

Step 1: Keep a bucket with a lid near your workspace. Whenever you have scraps and bits, toss them in the bucket. You can also add objects you’ve thrown on the wheel or handbuilt that you don’t like, or didn’t turn out the way you imagined. But don’t include any pieces on which you’ve already added underglaze or stains, unless you don’t mind it contaminating the clay. Keeping a lid on the bucket is really important to make sure the clay stays clean of bugs, dust, dirt, etc.This will ensure your reclaimed clay is easily workable and you won’t have foreign objects to remove! ReclaimClayPanels1_4

Step 2: When the bucket is full, and all of the bits and pieces have dried thoroughly (also called bone dry), cover the clay pieces in water, and watch the magic!

Step 3: All the dried clay needs is water to cause it to disintegrate (also called slake).

Step 4: Once the bits are returned to mud and fully disintegrated, it can be remixed.

Step 5: Use a blender of some sort to thoroughly mix the clay. You could do this by hand, but these blenders are cheap (I got this one for under $30 on Amazon), and it does the job quickly and thoroughly.

Step 6: Now you have a bucket of clean and lovely mud! Obviously, it is too wet to use. So we have to dry it out enough so we can handle it again. The best surface to use for this step is plaster. I just recently learned how to make plaster forms, and it is very easy, so don’t let this step intimidate you! Big Ceramic Store has a great tutorial on the subject, and there are videos on YouTube as well that teach you how to mix up plaster. ReclaimClaySteps5_8

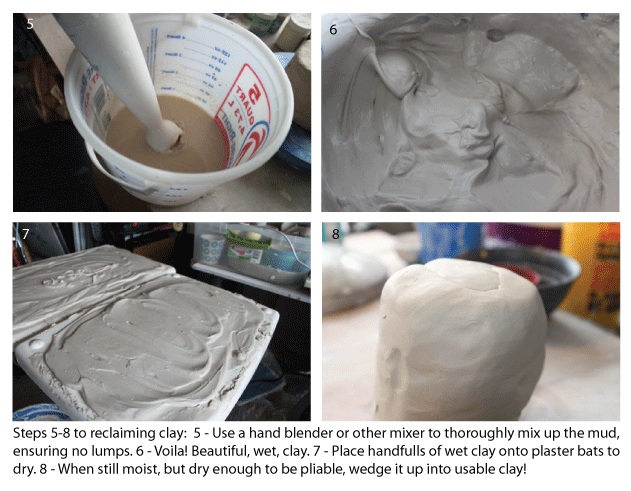
Step 7: I made these two forms by mixing the plaster and pouring it into the bottoms of two large plastic bins. Once the plaster cured, I set these two forms on a small table, and with both hands, “spooned” the wet clay onto the surface and smoothed it out like icing. The temperature in your area is the thing that determines how quickly the clay dries — we are having an unusual cool spell here in Texas. It would normally take only a few hours for the clay to dry, but this week it has taken 2 days!

Step 8: When the clay is dry enough to work, it will easily peel off the plaster forms. Then you simply wedge it up into a workable ball, and you are ready to start again!


Endless Curiosity

I have inherited the investigative gene in my family, and while mostly just useful, it can sometimes get out of hand. Basically it means that when I find myself interested in a subject, I am like a dog with a bone, and can’t let it go until I am satisfied that I understand it. Right now, I have an endless curiosity about the natural world and its ability to provide for and sustain humanity—specifically, in two areas–with fiber spun into yarn and made into fabrics, and clay formed into vessels for use.

Cups and a water jug
Cups and a water jug still wet from the wheel

So I thought I’d just take you along with me as I try to satisfy this curiosity in my clay journey, just in case you were wondering about it, too.

This all started with my own increasing amazement of our natural resources. I don’t want to sound ungrateful. I deeply appreciate clean water, available food, antibiotics and other advances that have freed us—at least some of us, looking at the world in its entirety—from ills that have plagued humanity through the ages. But, I am fascinated by the dual nature of the natural world. I say “the dual nature” because the natural world is both beautiful in its simplicity to provide, and amazingly complex within that provision.

Take fibers, for example. Linen, flax, wool, cotton, silk—all of these various fibers grow and reproduce, and did so and would do so without any intervention from us. Because of their natural properties—the way a fiber is constructed so that when it is spun, because of its natural design, the fibers interlock, become stronger, and can be made into the myriads of articles we need.

Clay is much the same—abundant in nature, and of such a specific construction in its nature that it is the perfect material for creating vessels—pots, dishes, water jugs, insulators, and even panels on the space shuttle. Clay is another natural material with astonishing properties.